Showing posts with label recipes. Show all posts

Friday, January 6, 2012

Homemade Hot Cocoa

Do you like hot chocolate? 

Our family absolutely loves it!

So when my dear friend, Kim, made some wonderful homemade hot cocoa for us last year, I knew we had to get the recipe!  She was so sweet to share it with us, so we decided to make it for gifts this year.  


Here's the "oh so simple" recipe:

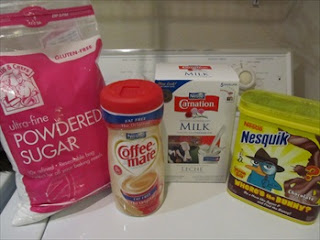
1 lb. powdered sugar
1 large Nesquik chocolate milk mix
9.6 oz Carnation powdered milk (my friend says other brands don't taste as yummy)
6 oz. Coffee-mate creamer


Stir the 4 ingredients together and store in an airtight container.

Here's how to make your yummy cup of cocoa...


We made these gifts for Sunday School and choir teachers and our friends
at our homeschool co-op.

We also made homemade hot cocoa gift packs for our extended family...
We put everything in a plastic shoebox/storage box with
festive tissue paper around it.  
We also made these super easy chocolate spoons to stir in
the hot cocoa!  We just dipped the spoons in melted
chocolate almond bark and then dipped some in sprinkles and
drizzled some with white chocolate almond bark.  Too cute!

Wednesday, October 5, 2011

I Made Homemade Hummus!


Last week, I decided to try something new...I made homemade hummus!  I've bought hummus before and thought it tasted pretty good.  Then, when I was visiting with my friend, Deena, she told me how she made homemade hummus!  That sounded interesting.

Soon after that, I found a post on Life As Mom with a homemade hummus recipe. She linked to this recipe, so I tried it last week!

And YUMMY!  I really liked it warm too!

And now I have something to add to my Christmas list...a FOOD PROCESSOR!  I managed to get it all mashed up in the blender but it took FOREVER!


Friday, September 2, 2011

Chicken Pot Pie

I love trying new recipes...

When my friend, Patti, made this yummy Chicken Pot Pie for our Bible study group one week this summer, I knew I needed the recipe. I've never made one with a pie crust before. My Mom always made it with biscuits on top, so that is what I've always done. And that is very yummy too!

So here's what it looks like before going into the oven...


And here's what it looked like just out of the oven...


And here's what it looked like on my plate. :) MmmMmm...good!


Chicken pot pie

2-10oz can chunck white chicken drained
2 boxes of ready made pie crust
6 tbs butter
1 cup diced potatoes (cook these a little)
1 cup chopped onion
1/2 cup chopped celery
1 cup frozen peas and carrots
2 cans cream of chicken soup
1/2 tsp ground white pepper
1/2 tsp ground sage (I didn't have any so I didn't use this)
1/2 tsp crushed rosemary (My husband said he'd do without it but I rather liked the flavor!)

Prepare bottom half of 2 pie crust shells and set aside. Melt butter and add vegetables. Sauté 5 minutes then add rest of ingredients. Mix well and divide mixture between the two pies. Place top pie crust on. Bake at 400 degrees for 10 minutes. Reduce to 350 for an additional 40 minutes.

Tip from Patti - I use the frozen onions and as a time saver I have been known to use the julienned cut frozen potatoes. The only reason for white pepper is appearance so I use black pepper because I didn't have white.

Enjoy!

Kim


Thursday, September 1, 2011

Peanut Butter Balls

My dear friend & college roommate, Deena, posted this recipe on her facebook & I was too intrigued not to try it. It's a pretty healthy snack & they are really tasty! And I even figured out if you make them into 60 (one-inch) balls, they are only 1.5 points on Weight Watchers! Not a bad little snack that fills you up!

Only 4 ingredients!


Peanut Butter Balls

1 c. honey
1 1/2 c. creamy peanut butter
2 1/2 c. dry milk powder
3 c. quick oats

Mix all together. Form into balls with your hands & freeze on wax paper lined cookie sheets until hardened. Store in freezer in ziploc bags. Makes about 60 balls.

To serve--thaw for as little as 3 minutes to be ready to eat. The longer they sit out, the softer they will be. Warning: Do not try to take a big bite right out of the freezer! It will hurt your teeth. :)

Enjoy!

Finding JOY in the journey,
Kim

Tuesday, May 31, 2011

Butterfinger Cupcakes

A few weeks ago, I made these oh so yummy cupcakes!


My friend, Jenna, had told me about these, so I was off to search the internet for the recipe. I found a few recipes on Blooming Foodie and Your Cup of Cake.


They are a bit of work, but they are worth it! (That is, if you are not on a diet. I can't make them while I'm trying to be good!)


If you try them, you'll have to let me know what you think!

Butterfinger Cupcakes

Caramel Sauce
½ can sweetened condensed milk
1 pkg. caramels (unwrapped from wrappers)
1 teaspoon vanilla extract

Cupcakes
Devil’s Food Cake Mix
3 eggs
½ cup water
¼ cup milk
½ cup oil
1 teaspoon vanilla extract
1 cup sour cream
½ can sweetened condensed milk
Caramel Sauce (homemade recipe above or store bought)

Butterfinger Buttercream
4 Butterfingers
¾ cup butter
4 oz cream cheese
1 ½- 2 ½ cups powdered sugar
1 tablespoon milk


Directions:

Preheat oven to 350 degrees and line muffins tins with cupcake liners.

Caramel Sauce: If you are not using store bought caramel, make caramel by heating the caramels and sweetened condensed milk. Let boil for 2-3 minutes while stirring constantly. Remove from heat and stir in vanilla. Set aside.

Cake: Lightly beat eggs, water, milk, and oil together. Stir in vanilla and sour cream and cake mix.

Fill cupcake liners ¾ full and bake for 13-18 minute or until a knife comes out clean. While cupcakes are in the oven, pour caramel sauce into a squeeze bottle with a small tip if available. (Believe me, this will make the process a whole lot easier!)

While cupcakes are still hot, fill with condensed milk/caramel mixture by pushing the tip of the squeeze bottle into them or use a knife to cut out a shallow hole at the top of each cupcake and spoon mixture into the hole. Keep cupcakes in airtight containers until ready to decorate.


Butterfinger Buttercream:
Unwrap the Butterfingers and do your best to shave off the chocolate layer. Take the orange middles and crush in a bowl on in a plastic bag. Sift as much of the candy as possible.
You want to get about ½ cup of orange Butterfinger powder.
Beat butter and cream cheese for 5 minutes. Add as much powdered sugar as desired and milk. Add the sifted Butterfinger and beat well.
Pipe onto cooled cupcakes and use the chocolate shavings and the parts that were too big to sift to decorate.

Enjoy!!!!


Tuesday, May 24, 2011

Dewberry Jelly by Eric

Eric & Evan recently discovered a dewberry patch behind our house. They decided to pick berries to make some jelly. Eric did this a few years ago and made a huge mess because the sugar/berry mixture boiled over. He learned to take the mixture off of the heat this time & didn't make much of a mess at all. He was quite proud of himself! And we are all enjoying the fruits of his labor. :)


Thursday, May 19, 2011

Cupcakes with Oreos & M&M's

OK, I've had this cupcake obsession since I took my cake decorating classes last summer! I enjoy baking & decorating cakes, but I really like making cupcakes even better! For on they are a lot easier to decorate than an entire cake! And sometimes you don't feel quite as guilty eating a cupcake for some reason. :)

So my friend, Jenna, has been experimenting with all sorts of cupcake recipes & it has been tempting me! So I decided I needed to try some too! I just had to find some reason to make & take them somewhere because I can't make them & keep them all here! WAY TOO TEMPTING!

First, I made M&M Cupcakes because I had a big bag of M&M's sitting around that kept begging me to eat them. Instead, I just found a recipe to use them in!

M&M's on top & inside!

TIP: I learned a trick from reading some blogs...if you mix just a tablespoon of flour with the "mix-in" (M&M's, Oreos, or whatever you want to mix in the cupcake batter) before you pour it in the batter, then it will keep the "mix-in" from dropping to the bottom of the cupcake. It really worked pretty well! I just love learning tricks like that!


Next, I made these scrumptious Oreo Cupcakes...

Oreos on the top...

And Oreos in the middle AND on the bottom...YUM!


I'll post the recipes soon...I'm off to watch American Idol with my sweet husband!

***OK, it's now Thursday, & I'm posting the recipes for those who might like to try these.***

Oreo Cupcakes


ADAPTED from Beantown Baker

Cupcakes

1 stick unsalted butter, at room temperature
1 cup milk

2 tsp vanilla extract

2 1/4 cups flour, plus 2 Tbsp for the Oreo chunks
1 tsp baking powder
1/2 tsp salt
1 2/3 cup sugar

1/3 c. plain yogurt

1 pkg. instant white chocolate pudding

4 large eggs

1 pkg Oreo Cookies (~45 cookies)

Preheat over to 325F. Insert liners into a medium cupcake pan.

Twist apart 24 Oreos. Place the wafer with filling on it, filling side up, in the bottom of each paper liner. Cut 12 of the other wafers in half. Save these 24 halves to place in the frosting.

Crush the other wafer halves, also for garnishing.

Cut the remaining Oreo cookies into quarters with a sharp knife. Toss with 2 Tbsp flour and set aside. (This helps them not drop to the bottom of the batter.)

In a large bowl cream the butter until fluffy, about 3-5 minutes. Add the milk and vanilla and mix to combine.

In a separate bowl mix together the flour, baking powder, and salt.

Add the dry ingredients to butter mixture. Mix until integrated. Stir in sugar. With an electric mixer on low speed, beat for 30 seconds. Turn the mixer up to medium speed and beat for 2 minutes. Add the eggs. Beat for 2 more minutes. Stir in the quartered cookies.

Fill the cupcake liners three-quarters full. Bake for about 20-25 minutes or until a toothpick inserted in the center of cupcakes comes out clean. Cool cupcakes in the pan.


Cream Cheese Frosting

4 oz cream cheese at room temp
1 stick butter at room temp
1 Tbsp vanilla extract
4-5 cups powdered sugar

Cream butter and cream cheese until fluffy (about 3-5 minutes).

Add vanilla extract. Slowly add powdered sugar until desired consistency is reached.

Assembling the cupcakes

Once cupcakes have cooled completely, frost with cream cheese frosting. Sprinkle with crushed Oreos and place 1/2 of an Oreo on the frosting of each cupcake.


M & M's Cupcakes

1 package French Vanilla cake mix
1 package vanilla pudding mix
2 tablespoons flour
1 cup milk
1/3 cup oil
4 eggs
1/3 cup plain yogurt

1 1/4 cup M&Ms (toss 2/3 cup of M&M in 1 T. flour to keep from falling to bottom of batter)

Preheat oven to 325F.
Line two 12-cup muffin pans and one 6-cup pan with cupcake paper liners.
In a large bowl, combine cake mix, pudding mix, flour, milk, oil, yogurt, and eggs.
Beat with an electric mixer on low speed 30 seconds. Then beat on medium speed 2 minutes, scraping down sides of bowl once or twice with a rubber spatula.
Quickly fold in 2/3 cup M&M's and divide among muffin cups
Sprinkle a few more candies on top of each.
Bake 20 to 22 minutes, until cupcakes are fully risen and golden brown on top.
Remove and let cool.
Frost each cupcake with cream cheese frosting. (The same as the Oreo Cupcake recipe.)
Sprinkle remaining M&M's on top.


Adapted from The Cupcake Club.


Saturday, May 14, 2011

Homemade Granola


I came across a Homemade Granola Recipe on the Life As Mom blog that sounded really interesting. I started searching for other recipes. I took what looked good on each of the recipes and came up with my own. I also had to use what I had on hand. I only had peanuts and pumpkin seeds. I didn’t have any almonds, sesame seeds, or sunflower seeds, but I definitely want to use them next time I make it. This was really good…especially with vanilla yogurt! Eric liked it with milk too!

Honey Granola Recipe:

4 cups old-fashioned rolled oats (not instant)

1/2 cup whole raw almonds

1/2 cup raw sunflower seeds

1/2 cup raw pumpkin seeds

1/4 cup sesame seeds

2 teaspoons ground cinnamon

1 teaspoon salt

1/4 cup water

1/4 cup canola oil or ¼ cup butter

1/2 cup honey

¼- ½ cup pure maple syrup

½ cup light brown sugar

2 teaspoons vanilla extract

1 cup dried fruits (cranberries, cherries, apricots, dates, figs, and/or raisins) (optional)


Preheat oven to 325 degrees F and place rack in the center of the oven. Either butter or line a baking sheet with parchment paper. (I used aluminum foil & sprayed it with Pam.)

In a large bowl combine the rolled oats, nuts, seeds, ground cinnamon, and salt.

In a small saucepan, stirring constantly, bring just to a boil the water, oil, honey, syrup, brown sugar, and vanilla extract. Pour this mixture over the dry ingredients and toss together, making sure all the dry ingredients are coated with the liquid. Spread onto the prepared baking sheet and bake for about 25 - 40 minutes or until golden brown, stirring occasionally so the mixture browns evenly. (The browner the granola gets (without burning) the crunchier the granola will be.) Place on a wire rack to cool. You will notice that the granola may still be sticky when it is removed from the oven but it will become crisp and dry as it cools. Make sure to break up any large clumps of granola while the mixture is still warm. Once the granola has completely cooled, store in an airtight container or plastic bag in the refrigerator. It will keep for several weeks.

Serve with dried or fresh fruit and milk.

Makes about 6 cups.

You could find other recipes at www.joyofbaking.com and www.lifeasmom.com.


Tuesday, May 10, 2011

Fish Tacos


Although we live in Texas, I must admit that Mexican food is not my favorite! I know that is a horrible thing to admit, but spicy, greasy, and extra cheesy don’t always treat Kim very well. J And when I go to a Mexican restaurant, I have NO self-control with those chips! I get so mad at myself because I always eat WAY too many—even when they don’t taste very good.

Because I do live in Texas and my husband is in the ministry, we do eat out more than we should. And we usually find ourselves eating at Mexican restaurants more times than I prefer. So when we do eat Mexican, I usually order chicken fajitas and enjoy them!

But, I have found a new favorite dish at Mexican restaurants…FISH TACOS! Anytime I find them on the menu, I just have to try them.

I’ve been afraid to try to make them at home because I am not good at cooking fish. So I’ve been searching for fish taco recipes & I've finally found them! I have combined several different ideas & recipes.

My college roommate told me that she makes them by sprinkling taco seasoning on tilapia & then grilling them on her George Foreman grill. (Great idea if I could only find my grill in the storage boxes in the garage.) But I did cook them on top the stove with the taco seasoning & the fish was fabulous! She also makes a chipotle ranch sauce using ranch dressing & Mrs. Dash Southwest Chipotle seasoning. Sounds yummy!

I also found these two sauce recipes that are really good too:

Cilantro Sauce

· 1 bunch of cilantro- washed and dried

· 1/4 cup of REAL mayo

· 1/4 cup sour cream

· 1 clove of garlic peeled

· juice of 1 lime

· salt and pepper to taste

Throw all of the ingredients into a food processor or blender and blend away. If you would like a thinner sauce you can add 1-3 tablespoons of milk.


Tomato Avocado Salsa

· 2 cups plum tomatoes diced ( about 2 med)

· 1/3 cup diced onion

· 1 avocado diced

· 1 jalapeno minced-optional

· 2 tablespoons minced cilantro

· 1 tablespoon fresh lime juice

· 1/8 teaspoon salt

· 1/8 teaspoon black pepper


Combine all ingredients in a medium bowl; toss well.

You will also need shredded cabbage and warm corn or flour tortillas to make your tacos. I prefer corn tortillas for the fish tacos for some reason.

To assemble tacos: Place fish into warm tortilla, top with cabbage, cilantro sauce, tomato avocado salsa and/or hot sauce.

I hope you enjoy fish tacos as much as we do!

Tuesday, May 3, 2011

Sweet & Sour Meatloaf

I had an awesome college roommate at Ouachita Baptist University! And I'm so thankful that we are still close friends 20 years later and even though we live many, many miles apart...she's in Amarillo and I'm in East Texas.

I called her today for a fish taco recipe and then we started sharing other recipes & cooking tips...something we do often. And then I remembered my favorite meatloaf recipe that I got from another one of our college friends. I'm going to have to make it again really soon. It's so good!

Sweet & Sour Meatloaf
(I got this from Laura Wood Drury's Mom when I was in graduate school in Memphis years ago. It's still one of my absolute favorites. Do your favorite recipes have food stains on them like mine do? Or am I the only messy cook around?)

1 ½ lb. ground beef

1 c. dry bread crumbs

1 t. salt

¼ t. pepper

2 eggs

1 t. instant minced onion

1 can (15 oz) tomato sauce, divided

Topping:

Reserved tomato sauce

2 T. brown sugar

2 T. vinegar

½ c. sugar

2 t. prepared mustard

Mix together beef, bread, salt, pepper, & eggs. Add onion and ½ of tomato sauce. Form into a loaf in a 9x5x3 pan. Bake at 350 degrees for 50 minutes. In a saucepan, combine topping ingredients. Bring to a boil. Pour over meatloaf after the 50 minutes & bake an additional 10 minutes.

Makes about 6 servings.